In our family, boat ownership has been a cooperative effort, and as the guy who maintains and repairs Molly's major systems, it's those details I'm keen to document first, not only for our benefit (and record) but also for fellow trawler travelers who might encounter maintenance considerations similar to those we faced upon making Molly ours. Besides, careful prep is the first step in any successful cruise.
Molly's distance from home was both attractive and a challenge. Part of the reason my folks wanted to buy her was because she was located perfectly for a summer trip through some of the best cruising waters in the Great Lakes region. Ensuring that she was ready for an extended trip - likely the longest trip she'd ever taken - meant tending to critical details as well as those details that, under different circumstances, might have been delayed for weeks, months, or maybe even years. At almost 40 years old, Molly, although generally well cared for, showed some of the wear/use/neglect issues typical of boats her age. Her mostly factory wiring had received a few "creative" upgrades through the years as previous owners added systems and components. Some of her upgrades were installed well - e.g., the Westerbeke generator, two main 30-amp service panels and a separate breaker panel for AC systems - while other upgrades were questionable.
 |
| Snugged away for a long winter's nap. Katlynn Marine. |
 |
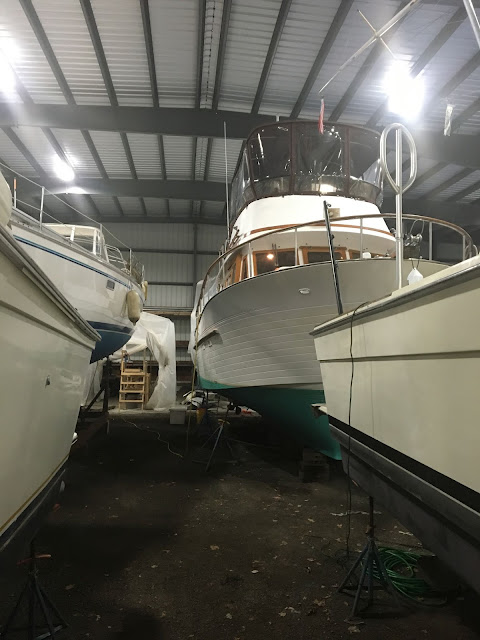
| Molly looked pretty impressive out of the water. We were fortunate to have her indoors so we could get a headstart on the projects. |
With Molly wintering in indoor storage in NY, over nine hours away from our home in Michigan, we prioritized projects carefully, focusing first on safety and proper function of essential systems. My dad, my two sons (10 and 14), and I spent a week during spring break working from sunup to sundown in temperatures hovering right around freezing. It was cold, but it was fun and productive. Later, in mid-May, we traveled back to NY to finalize a few pre-launch tasks and see that Molly splashed safely.
Without a knowledgeable previous owner (or broker) to introduce us to the boat's systems, we focused first on figuring out how things worked, what worked what, and what went where. It's amazing just how much time that process consumes - and just how confusing it can be to determine the ins and outs of multiple systems. We spent hours tracing wires, climbing around in the engine compartment, poking around in lockers and recesses, identifying hoses and systems, and on and on. Each time we encountered a dead end with some wire or hose or switch or component - or whatever - we removed it. By the end of the first day, we'd stripped a few dozen wires and eliminated several old, non-functioning components. Under the starboard engine alone, for example, I found three obsolete depth transducers someone had placed in ziploc bags against the hull in a vain attempt to replace a non-functioning thru-hull transducer. In the area under the flybridge dash, I pulled enough unused wiring to fill a 13-gallon trash bag.
 |
| Compared to our sailboat, Molly has an abundance of thru-hulls - some of which we will glass closed this winter. |
 |
| These early photos represent just a small idea of the hoses, lines, wires, and systems we had to trace and decipher. |
With all the old wiring removed by the second day, we began streamlining the electrical system. Molly originally had three battery banks: one 8d battery for the house bank, and two 4d batteries dedicated to starting the twin Ford Lehman 120 engines. For some reason, all of the 12-volt house loads were drawn from the port start battery, and only one lone wire ran from the house bank, up to the flybridge, to power the Raymarine radar unit. Far more concerning was the fact that there was no way to shut off, isolate, or direct the battery banks via a battery selector switch. And the old, original battery cables, with their broken, flaking insulation, were an electrical fire just waiting to happen. All of it was baffling - and a little frightening.
I removed the two original - and worn - Cole-Hersee battery selector switches from their locations under the step at the helm and installed two new high-amperage battery selector switches, designating one for the house bank and the other for the two starting banks. I ran all new battery cable from the battery selector switches, properly fusing the two start circuits with ANL fuses. I also installed terminal fuses on the house bank to provide over-current protection in the event of runaway house loads. I added a new Blue Seas ACR (automatic charging relay) between the starboard start battery and the house bank to automatically combine the banks during charging and isolate them during discharge. The original plywood battery shelves, bowed and sagging from years of use, needed replacing, so I cut new shelves out of 3/4" plywood and repositioned the batteries, adding cleats and straps to keep them secure. I tidied up the wiring and cleaned up the runs, bundling as necessary.
 |
| Batteries sitting atop new shelf. Start batteries to the right, house battery at top of frame. Generator battery at left. I also added a "bulkhead" at the aft end of the battery shelf for reinforcement and a place to mount the new ANL fuses so they could be accessed easily. |
 |
| One of the two new battery selector switches. |
 |
| Automatic Charging Relay combines house and start batteries when charging voltage exceeds a specified threshold, and then isolates batteries during discharge. Note also positive and negative busses for starting circuit. |
 |
| Jake cutting our 3/4" plywood into a battery shelf, a bilge cover, and a new shelf for the water heater. |
 |
| This center portion of the bilge was uncovered when we got Molly. It made sense to me to cover the majority of it while still leaving enough space open for easy inspection of the bilge and access to the two bilge pumps - just out of the frame at bottom. |
 |
| We mounted the new Balmar SmartGauge beside the helm station and above existing panels for the air conditioner and the generator control panel. |
 |
| All of these pictures are before tidying up the wiring and runs. |
Keeping tabs on battery health is critical to battery life, so we installed a Balmar SmartGauge battery monitor on the house bank and the starboard start bank. (SmartGauge only monitors two banks, and with the starboard start battery configured to handle anchor windlass loads, we thought it wise to monitor that start battery more closely). Balmar's gauge is about as simple as it gets with only a few connections - far simpler than a shunt style monitor, for example.
Up in the flybridge glovebox, I installed a Blue Seas fuse block to handle all sensitive electronics loads - such as VHF, radar, depth sounders, etc - and labeled each connection. At the same time, I installed a new Raymarine ST40 depth display and transducer for the lower helm station (since only the upper helm had a depth display).
 |
| Jake helps with the wiring under the flybridge dash. Note the new fuse block in the glovebox at left. |
In the process of tracing and stripping wires, I managed to identify a poor connection to the autopilot which, once reconnected, got the autopilot back online, a major win. (Unfortunately, on Molly's maiden voyage, a shakedown on Sodus Bay, the autopilot gave up the ghost with a POP and the control unit started smoking).
With electrical loads sorted and safely routed, fused, or switched, I turned my attention to the below-the-waterline tasks.
When we surveyed Molly, only a few of her seacocks were operable. Beyond that, we didn't even know for certain how many seacocks she had or where they were located. While she was out of the water and blocked for winter, we identified each seacock from the outside and made a diagram for reference, then found each seacock inside the boat. Imagine my surprise when I discovered that two seacocks - one a large head discharge seacock, the other a 1" head intake - were hidden and inaccessible under a plywood shelf supporting the water heater. Once I'd removed the water heater and shelf to access the seacocks, the head intake hose, hidden under the shelf and routed through a bulkhead into the forward cabin, crumbled in my hand. I couldn't help but think that the prior owners had planned to take her down the ICW to their home in Florida if she hadn't sold by fall. I was amazed that someone would consider such a trip without addressing basic safety/maintenance items.
 |
| This early picture shows the new shelf for the water heater. At this point, we still had some questions about which hose went where because I focused on ensuring that the seacocks were functional first, particularly since hoses could be changed later, once she was in the water if necessary, with a working seacock. |
 |
| Working in the confines of the engine compartment was not easy, especially when it came to shuffling components around to access, in this case, the seacocks below the water heater. |
 |
| Molly's high-capacity bilge pump (red) and the new low-capacity pump (blue) and automatic float switch and alarm. |
 |
| Molly's manual bilge pump, located in the aft lazarette. |
I disassembled, cleaned, greased, and reassembled each seacock, replacing any suspect or defective hoses. Fortunately, all of the bronze, tapered plug seacocks came apart without too much aggravation and were in good condition. I cut a new 3/4" plywood shelf for the water heater to rest atop and added two large access holes to make inspecting and closing the head seacocks possible.
There were additional safety items needing attention: a high-volume bilge pump had been routed to an undersized seacock, decreasing the pump's ability to evacuate water. To make it worse, someone had wrapped the undersized seacock barb with electrical tape to get the oversized hose to "fit." No, no, no. On the port side of the engine compartment I'd identified an unused seacock at the waterline that was slightly larger than the bilge pump hose diameter, so I rerouted the hose and plumbed the pump into the new thru-hull, making sure to run the discharge hose higher than the outlet to prevent siphoning. Although the new arrangement was better, there was no way to know when the bilge pump was running or for how long, a potential safety issue, so I wired in a second, smaller bilge pump on an automatic float switch that included an LED indicator and audible alarm. I routed the discharge hose to an appropriate seacock and installed the LED and alarm at the helm station. Now Molly had two functioning automatic bilge pumps and a high water alarm. Much better.
While I was busy doing my best to erase Molly's past life, the boys were doing the same on the transom, carefully scraping and scrubbing away at her old name and lettering: Green-eyed Lady. Those poor little dudes must have spent two hours sitting on the swim step, freezing their fingers off, during spring break.
 |
| Jake and Josh did their best to remove adhesive residue. Ultimately, it took loads of remover and a good compounding with the Makita buffer to eliminate her old name and graphic. |
When we sea trialed Molly back in September 2017, I noticed that there was a slight wobble in the starboard prop shaft at the coupling. I knew it wasn't good, but I wasn't entirely sure of the cause. Upon Molly's launch in May, while inspecting her running gear once she was back in the water, I noticed that the fit between the shaft and coupling was sloppy. With only a few hours left before I had to return to Michigan and my job, I attempted to remove the coupling, but the set screws were frozen in place with Loctite. I was already exhausted from three long days of work and, with no time left, we figured it was best to leave this task to the yard. We asked them to have the mechanic take a look at it and see what he could do to fix the problem. A week later the yard called to say that they'd looked at it and the shaft would need to be cut and replaced! Call me cheap, call me reasonable, call me ignorant - whatever - the proposed fix seemed drastic and unnecessary. I got online, ordered a Buck Algonquin split coupling, returned to Molly, drilled out the old set screws, removed the original coupling, installed the new coupling and aligned the engine, returning Molly to service for less than $200. (I'm happy to report that Molly made it all the way home - over 1,000 miles - without issue).
 |
| I suspect poor engine alignment caused the problem. |
 |
| Set screws drilled out and using a socket to press - carefully - the old coupling off the shaft. |
 |
| Coupling off. Note the hose clamp around the shaft to prevent it from sliding out of the boat and causing flooding. |
 |
| New coupling and shaft key installed. Engine realigned. |
 |
| New coupling, old coupling. |
There were additional repairs we chose to tackle preemptively: we replaced the starboard engine raw water pump because I was not comfortable with the wear on the driveshaft tang, and we replaced all four coolers (two oil coolers and two transmission coolers) since they appeared to be original and American Diesel Corp recommends replacement at 2000 hours. We figured it was relatively cheap insurance against a major engine or transmission repair/replacement.
 |
| Access to the starboard side of the starboard engine is tight, but I can squeeze in there. |
 |
| Ironically, this was the port engine raw water pump, which is easily accessible in the engine compartment. |
 |
| Starboard engine raw water pump with tang wear. |
 |
| Retrieving impeller vane bits from the oil cooler. |
 |
| Starboard engine raw water pump removed. |
 |
| New (gray) transmission cooler. |
 |
| Photo shows new (gray) engine oil cooler and, ahead of it, the new raw water pump. |
With the critical items repaired and online, I proceeded with maintenance items such as changing the oil in the injection pumps, installing new fuel filter elements on both the secondary Racor 900s and the primary, engine-mounted filters. (Later, after transiting the Trent-Severn, approximately 50 hours engine time, I did a full fluids change: both transmissions, engine oil, and injector pump oil).
 |
| Starboard and port fuel vacuum gauges installed. |
These older trawlers often have fuel issues. Guessing that Molly's fuel had probably been sitting in her tank for years, we decided to install remote Racor vacuum gauges that would, hopefully, allow us to prevent any fuel-related issues by changing filters before they clogged. I'm happy to report that we had zero fuel issues during our 1,000 mile journey home, despite some sloppy seas and plenty of rolling.
With only one 20-gallon holding tank for two heads and six people, it seemed wise to install a second holding tank and route each head into its own dedicated holding tank. I chose an area in the lazarette suitable for a new 20-gallon tank, routed new hoses, and installed a new pump out fitting on the aft deck and a tank vent on the transom.
 |
| Water testing the new holding tank at home. |
 |
| Finding the best location for the aft head holding tank. This area worked perfectly. |
 |
| Deck plug after drilling hole for the holding tank pump out fitting. Top layer of teak deck, fiberglass skin, plywood core, fiberglass lower skin. |
Tasks remaining on our to-do list, after the major items had been crossed off, included installing a holding tank monitor (which does not work; save your money), wiring USB charging stations in the forward and aft cabins, installing LED lighting in the cabin fixtures, adding a wash down pump, and epoxying a couple cleats to the aft cabin top to secure a dock box for additional storage.
I'm sure there were a few other jobs here and there, but the rush to get Molly cruise-ready quickly was a bit of a blur. We departed Sodus Point, NY, on June 22 and headed NE for Sackett's Harbor and the Thousand Islands. Molly performed marvelously that day, and each day thereafter, eventually carrying her crew safely home to St. Joseph, MI, with nary a breakdown. The only malfunction during the trip was a generator impeller and a couple nuisance trips of the fuses on the starting circuit, which was easily corrected with higher-capacity fuse protection.
 |
| Molly gets her new name! |
 |
| Launch day! Seacocks serviced, bottom paint touched up, name applied. Fingers crossed! |
 |
| In she goes! |
 |
| She floats. |
 |
| Scores of last-minute projects at Katlynn Marine in Sodus Point, NY, before Molly is ready to depart. Note new dockbox mounted on aft cabin top. |


Comments
Post a Comment